
by Bex
I am SO pleased with this little make-over! It is so simple to do but so effective and if you already have paints or don't want as many colours as me, it could be pretty cheap too.

I always planned to brighten up our new 8 drawer Hemnes chest in the nursery with some new knobs. I'd seen these ones on Etsy and had chosen a few to ask for a custom order (which it stated was an option). Unfortunately by the time I got round to ordering them after we moved down to Sussex, they were no longer available (although the shop is still open and other options seem to be for sale) and my Etsy email asking about the knobs received no response.
As an alternative, I found another seller with some rainbow knobs (individual colours rather than patterns) who also hand paints patterned knobs so sent her an email asking if she could do something similar to the ones I wanted. She was very helpful and explained that the above knobs appeared to have printed designs rather than painted on but that she could help me with the more simple spots & stripes and suggested one rainbow instead of lots of mini ones. This got me thinking that maybe I should have a go at doing it myself. I love my little crafty projects and although I haven't really painted before (I'm not very good at arty things) I thought it would be nice to be able to say I did them myself.
I'm so glad I did! It kept Nik happy as the plain wooden knobs were just £4.89 for a pack of 10 from Toolstation (I needed 2 packs as we need 15 knobs, 12 for the drawers and 3 for the Hemnes daybed drawers). I bought paints from Hobbycraft whose signage was very helpful regarding which paint and brushes to buy as I'm a complete art novice. I bought the larger pack of these basic acrylic paints as they were half price at £20 for 36 colours including metallics (for any future crafty/arty projects I might want to do).

I also bought a gloss UV varnish, £10 for a large can, to protect the paint and make them look more professional and a bit glossy. The brushes were just £5 for a pack of 6 and I bought a fab little brush basin/palette for £4. Obviously this all adds up to quite a lot (£44.78) but I will still own the paints, brushes, varnish, basin and some spare knobs as well as my 16 painted ones. For a selection of plain colours (£1.59 each) and custom designs (£3.19 each) from Etsy, I would have spent approx £43 including shipping from the USA.


I'm sure he may not be so happy when he sees the final cost but I LOVE the result, I'm SO chuffed with them and I know he likes them too, he also did a very good job of varnishing them for me as the spray is obviously not good for the babies. He thinks I should start selling them but given how long they actually took me (a couple of days, although I was getting faster by the end) I'd have to charge a fortune to make it worth my while! As far as a wee Hemnes makeover goes, I reckon it was worth every penny!
Top tip: put the screws into each knob so you can hold them without touching the wet paint.

Some colours were more translucent than others and some looked better when mixed with the opaque white. I also mixed up some colours myself to get exactly the ones I wanted. The plain ones mostly required 2 coats but some needed 3, especially the orange as the grain of the wood was showing through. You could obviously put an undercoat on but they mostly didn't need it.

The stripy ones were the trickiest. I did the stripes by hand rather than masking every layer which would take a lot longer to ensure each colour had dried sufficiently before taping over it.
For the more detailed ones like the spots and the rainbow, I just drew the pattern on first with a pencil so I would be less likely to mess it up.

I just finished the stripy ones roughly round the edge so I could smooth the edges with white at the end for a better finish. I did use masking tape here and got pretty decent results I think.

I tried to finish one of them with white on the underside but as the tape had to curve round, it wasn't a smooth edge and the white leaked under. I just moved the tape up and re-did it at the outer point of the curve where the tape lay flat all around:

I had to make one a bit curvy as I hadn't brushed the colour (on my first stripy one) far enough over the edge:

Despite learning as I went and them being far from perfect, I am still really chuffed with them all!

I had so much fun painting them, playing with mixing up colours and creating different designs.

To protect the finish and make them a little glossy, Nik fashioned a holder by cutting a cross into a box and sprayed the first (orange) one inside a large box to catch any excess spray. It was far too stinky though so he then cut more crosses to do a few at once and took them outside to spray instead. We gave them 2 thin coats and they're not overly shiny. We could have done more coats for a glossier finish but we liked them after 2 coats and I was desperate to get them on the drawers!


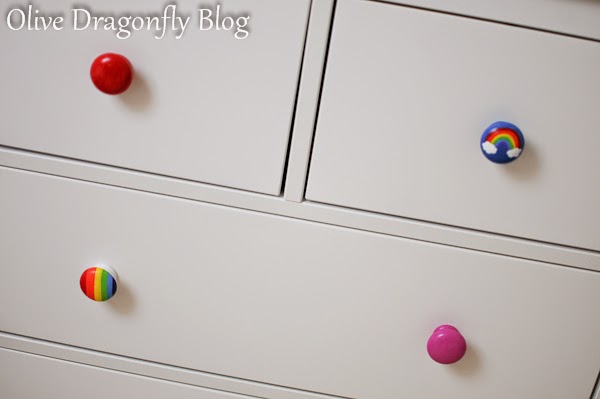
So here they are, swapped for the boring black metal ones and brightening up the room nicely. You can tell they were hand painted (especially the rainbow and stripes) but I think that adds to the charm - if they looked too professional then people might not believe I did them myself ;)

Nik's favourite is the rainbow with the clouds. I'm quite fond of the spotty ones. :)

I am SO pleased with this little make-over! It is so simple to do but so effective and if you already have paints or don't want as many colours as me, it could be pretty cheap too.
I always planned to brighten up our new 8 drawer Hemnes chest in the nursery with some new knobs. I'd seen these ones on Etsy and had chosen a few to ask for a custom order (which it stated was an option). Unfortunately by the time I got round to ordering them after we moved down to Sussex, they were no longer available (although the shop is still open and other options seem to be for sale) and my Etsy email asking about the knobs received no response.
 |
| Image Source I wanted the stripy ones, the spotty one, the one with rainbows and the one with the single unicorn. |
As an alternative, I found another seller with some rainbow knobs (individual colours rather than patterns) who also hand paints patterned knobs so sent her an email asking if she could do something similar to the ones I wanted. She was very helpful and explained that the above knobs appeared to have printed designs rather than painted on but that she could help me with the more simple spots & stripes and suggested one rainbow instead of lots of mini ones. This got me thinking that maybe I should have a go at doing it myself. I love my little crafty projects and although I haven't really painted before (I'm not very good at arty things) I thought it would be nice to be able to say I did them myself.
I'm so glad I did! It kept Nik happy as the plain wooden knobs were just £4.89 for a pack of 10 from Toolstation (I needed 2 packs as we need 15 knobs, 12 for the drawers and 3 for the Hemnes daybed drawers). I bought paints from Hobbycraft whose signage was very helpful regarding which paint and brushes to buy as I'm a complete art novice. I bought the larger pack of these basic acrylic paints as they were half price at £20 for 36 colours including metallics (for any future crafty/arty projects I might want to do).
I also bought a gloss UV varnish, £10 for a large can, to protect the paint and make them look more professional and a bit glossy. The brushes were just £5 for a pack of 6 and I bought a fab little brush basin/palette for £4. Obviously this all adds up to quite a lot (£44.78) but I will still own the paints, brushes, varnish, basin and some spare knobs as well as my 16 painted ones. For a selection of plain colours (£1.59 each) and custom designs (£3.19 each) from Etsy, I would have spent approx £43 including shipping from the USA.
I'm sure he may not be so happy when he sees the final cost but I LOVE the result, I'm SO chuffed with them and I know he likes them too, he also did a very good job of varnishing them for me as the spray is obviously not good for the babies. He thinks I should start selling them but given how long they actually took me (a couple of days, although I was getting faster by the end) I'd have to charge a fortune to make it worth my while! As far as a wee Hemnes makeover goes, I reckon it was worth every penny!
Top tip: put the screws into each knob so you can hold them without touching the wet paint.
Some colours were more translucent than others and some looked better when mixed with the opaque white. I also mixed up some colours myself to get exactly the ones I wanted. The plain ones mostly required 2 coats but some needed 3, especially the orange as the grain of the wood was showing through. You could obviously put an undercoat on but they mostly didn't need it.
The stripy ones were the trickiest. I did the stripes by hand rather than masking every layer which would take a lot longer to ensure each colour had dried sufficiently before taping over it.
I just finished the stripy ones roughly round the edge so I could smooth the edges with white at the end for a better finish. I did use masking tape here and got pretty decent results I think.
I tried to finish one of them with white on the underside but as the tape had to curve round, it wasn't a smooth edge and the white leaked under. I just moved the tape up and re-did it at the outer point of the curve where the tape lay flat all around:
I had to make one a bit curvy as I hadn't brushed the colour (on my first stripy one) far enough over the edge:
Despite learning as I went and them being far from perfect, I am still really chuffed with them all!
I had so much fun painting them, playing with mixing up colours and creating different designs.
To protect the finish and make them a little glossy, Nik fashioned a holder by cutting a cross into a box and sprayed the first (orange) one inside a large box to catch any excess spray. It was far too stinky though so he then cut more crosses to do a few at once and took them outside to spray instead. We gave them 2 thin coats and they're not overly shiny. We could have done more coats for a glossier finish but we liked them after 2 coats and I was desperate to get them on the drawers!
So here they are, swapped for the boring black metal ones and brightening up the room nicely. You can tell they were hand painted (especially the rainbow and stripes) but I think that adds to the charm - if they looked too professional then people might not believe I did them myself ;)
 |
| Obviously I made enough for the daybed handles too! |
Nik's favourite is the rainbow with the clouds. I'm quite fond of the spotty ones. :)


4 comments:
These are brilliant!
Oh my goodness, these are brilliant! When we have kids, totally going to do this to an old chest of drawers to jazz it up. They look fab. x
Wow Wow and double Wow... I love the rainbow one too! x
These are so cute!
Post a Comment